Lesson 2: How does CSS work?
In this lesson you will learn how to make your first style sheet. You will get to know about the basic CSS model and which codes are necessary to use CSS in an HTML document.
Many of the properties used in Cascading Style Sheets (CSS) are similar to those of HTML. Thus, if you are used to use HTML for layout, you will most likely recognize many of the codes. Let us look at a concrete example.
The basic CSS syntax
Let's say we want a nice red color as the background of a webpage:
Using HTML we could have done it like this:
<body bgcolor="#FF0000">With CSS the same result can be achieved like this:
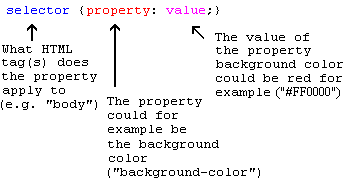
body {background-color: #FF0000;}As you will note, the codes are more or less identical for HTML and CSS. The above example also shows you the fundamental CSS model:

But where do you put the CSS code? This is exactly what we will go over now.
Applying CSS to an HTML document
There are three ways you can apply CSS to an HTML document. These methods are all outlined below. We recommend that you focus on the third method i.e. external.
Method 1: In-line (the attribute style)
One way to apply CSS to HTML is by using the HTML attribute
style. Building on the above example with the red background color, it can be applied like this:<html><head><title>Example</title></head><body style="background-color: #FF0000;"><p>This is a red page</p></body></html>
Method 2: Internal (the tag style)
Another way is to include the CSS codes using the HTML tag
<style>. For example like this:<html><head><title>Example</title><style type="text/css">body {background-color: #FF0000;}</style></head><body><p>This is a red page</p></body></html>
Method 3: External (link to a style sheet)
The recommended method is to link to a so-called external style sheet. Throughout this tutorial we will use this method in all our examples.
An external style sheet is simply a text file with the extension .css. Like any other file, you can place the style sheet on your web server or hard disk.
For example, let's say that your style sheet is named style.css and is located in a folder named style. The situation can be illustrated like this:

The trick is to create a link from the HTML document (default.htm) to the style sheet (style.css). Such link can be created with one line of HTML code:
<link rel="stylesheet" type="text/css" href="style/style.css" />
Notice how the path to our style sheet is indicated using the attribute
href.The line of code must be inserted in the header section of the HTML code i.e. between the
<head> and </head> tags. Like this:<html><head><title>My document</title><link rel="stylesheet" type="text/css" href="style/style.css" /></head><body>...
This link tells the browser that it should use the layout from the CSS file when displaying the HTML file.
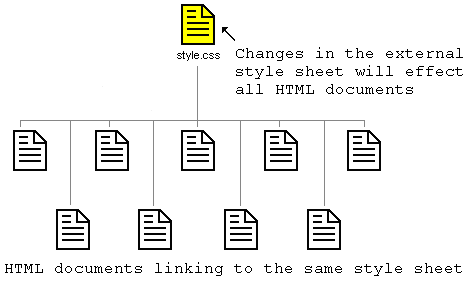
The really smart thing is that several HTML documents can be linked to the same style sheet. In other words, one CSS file can be used to control the layout of many HTML documents.

This technique can save you a lot of work. If you, for example, would like to change the background color of a website with 100 pages, a style sheet can save you from having to manually change all 100 HTML documents. Using CSS, the change can be made in a few seconds just by changing one code in the central style sheet.
Let's put what we just learned into practice.
Try it yourself
Open Notepad (or whatever text editor you use) and create two files - an HTML file and a CSS file - with the following contents:
default.htm
<html><head><title>My document</title><link rel="stylesheet" type="text/css" href="style.css" /></head><body><h1>My first stylesheet</h1></body></html>
style.css
body {background-color: #FF0000;}
Now place the two files in the same folder. Remember to save the files with the right extensions (respectively ".htm" and ".css")
Open default.htm with your browser and see how the page has a red background. Congratulations! You have made your first style sheet!
Hurry on to the next lesson where we will take a look at some of the properties in CSS.
Comments
Post a Comment